|
| These lesson plans began as journal notes recorded at the end of the day by Marissa Kunz, a graduate intern from the San Francisco Art Institute. She was assisting Josefa Vaughan, teaching artist, employed by the Hills Project which sponsors “Fine Arts Fridays” at Starr King Elementary School in San Francisco. |
|
Clays | Collage | Construction | Drawing | Early Animation | Painting |  |
Clays | Page 2 of 6 | Construction | Lesson: Felt DesignsGrade level: Special Education, Elementary Grades Objectives:
- To study relative sizes and colors and to learn how to contrast differences in these two areas
- To arrange pre-cut shapes into a composition or pattern
Materials:
- Pre-cut felt shapes (such as stars, letters, and hearts)
- a square piece of felt (for the base)
Procedure: Pass out materials and let students experiment with arranging smaller shapes over larger ones using contrasting colors.
Lesson: Positive/Negative shapesGrade level: 3,4,5 Special Education Objectives:
- To learn how to alter and enhance found images
- To learn about positive and negative shapes
Materials:
- Machine cut stickers (the shapes were things like ducks, stars, teddy bears, etc.)
- paper
- color markers
Procedure: Students peel off the positive sticker shape and stuck it on one side of the paper. Then they had to stick the rest (a square shaped sticker with the middle shape missing, i.e. the negative shape) on the other side. The students then got to draw inside the shapes. At the end everybody sat in a circle and showed their work one by one.
Lesson: Paper Mosaics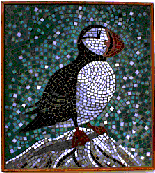 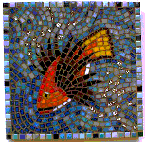 Grade level: Pre-K, 1, Special Education Objectives: Grade level: Pre-K, 1, Special Education Objectives:
- To make paper mosaics
- To see how colors blend optically
Vocabulary: Mosaic (a surface decoration made by inlaying small pieces of variously colored material to form pictures or patterns. Materials:
- ½ inch squares cut from colored magazine pages
- trays to put colored squares in
- glue
- paper
- pencils
Procedure:
- Show pictures of mosaics and ask students what they see, how is it different from a painting?
- Do a demonstration: Ask students to draw simple and big shapes as a guide (details wont work well). Suggest a picture of a pet, flower, person etc.
- Start from the middle and work your way out.
- Use a little glue on each piece, being careful not to use too much (otherwise the paper will bubble and dry with bumps).
|
|
|
|
|
|