Lesson: Intro to Clay
Grade level: Pre-K Objectives:
- To introduce students to clay
- To learn how to make basic shapes such as balls and snakes
- To learn how to cut clay with a string
Procedure: Josefa showed the children how to make the shapes and cut clay. For the Pre-K class all students collaborated on building a log cabin, each contributing many logs. The first grade class made a variety of shapes based on their ideas after making a perfect ball by rolling the clay in circles between the palms of both hands.
Lesson: clay (white, bake-able)
Grade level: Pre-K, 1 and Special Education Objectives:
- To familiarize students with clay: its feel, its possibilities, etc.
- To make beads/medallions that will be made into a group mobile
- Introduce the words "metaphor" and "cliché" by proposing that students invent their own heart shape
- To design a heart shape (for Valentine's Day) that no one has ever seen before
Materials:
- Clay
- 1/3 length straws to poke holes into the clay
- paper
- pencil
Procedure: Explain how the heart does not really look like our "cliché" depiction of it. Ask the students to design their own heart shape that is unlike any other heart shape. Then explain how the clay will be hardened, painted and hung as a mobile. Do a demonstration on how to poke a hole in a bead. Show some examples of hardened and painted clay. Later as students work, show them how a drawing can be transferred on to the white clay when it is pressed into a pencil drawing. Lastly collect and label each piece, readying it for baking. Save all drawings for display.
Lesson: Clay/shadow drawing
Grade level: 1 Objectives:
- To make balls with "Sculpy"
- To draw spheres and shadows that they cast in order to create 3D illusion
Materials:
Procedure: Explain that the clay will be baked and painted and students will make a small medallion with a hole in it. (They will later be made into a mobile). Next, everybody had to make four balls by first making one big ball, dividing it in half, then making two smaller balls and then dividing those in half. They were to end up with four smaller balls. Next, each student placed the four balls on the table and drew them with their shadows. They were instructed step-by-step, verbally and with visual demonstrations.
Lesson: Felt DesignsGrade level: Special Education, Elementary Grades Objectives:
- To study relative sizes and colors and to learn how to contrast differences in these two areas
- To arrange pre-cut shapes into a composition or pattern
Materials:
- Pre-cut felt shapes (such as stars, letters, and hearts)
- a square piece of felt (for the base)
Procedure: Pass out materials and let students experiment with arranging smaller shapes over larger ones using contrasting colors.
Lesson: Positive/Negative shapesGrade level: 3,4,5 Special Education Objectives:
- To learn how to alter and enhance found images
- To learn about positive and negative shapes
Materials:
- Machine cut stickers (the shapes were things like ducks, stars, teddy bears, etc.)
- paper
- color markers
Procedure: Students peel off the positive sticker shape and stuck it on one side of the paper. Then they had to stick the rest (a square shaped sticker with the middle shape missing, i.e. the negative shape) on the other side. The students then got to draw inside the shapes. At the end everybody sat in a circle and showed their work one by one.
Lesson: Paper Mosaics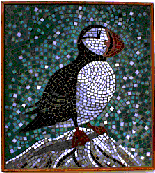 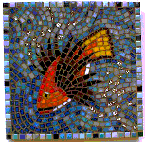 Grade level: Pre-K, 1, Special Education Objectives: Grade level: Pre-K, 1, Special Education Objectives:
- To make paper mosaics
- To see how colors blend optically
Vocabulary: Mosaic (a surface decoration made by inlaying small pieces of variously colored material to form pictures or patterns. Materials:
- ½ inch squares cut from colored magazine pages
- trays to put colored squares in
- glue
- paper
- pencils
Procedure:
- Show pictures of mosaics and ask students what they see, how is it different from a painting?
- Do a demonstration: Ask students to draw simple and big shapes as a guide (details wont work well). Suggest a picture of a pet, flower, person etc.
- Start from the middle and work your way out.
- Use a little glue on each piece, being careful not to use too much (otherwise the paper will bubble and dry with bumps).
Lesson: Gohei
Grade level: 5
Objectives:
- To fold an 8-1/2" x 11" piece of paper into an ornament that symbolizes power
- To make a Goheis: part of a sumo wrestler's uniform
- To review art vocabulary
Materials:
Procedure:
- Introduce left brain/right brain activity differences.
- Do a demonstration: fold paper in half, hot dog style. Cut ¾ inch slits into the paper's alternating long sides (every 1/2 inch) and fold flaps ("fold and flip, fold and flip") to make the stairs-shaped Gohei.
- On each "stair step" write down one word from the art vocabulary list students remember. (An assistant held the master art vocabulary list and was allowed to give clues)
Part 2: Marshmallow sculptures
Grade level: Pre-K, Special Education
Objectives:
- To explore the effect of gravity on (and the adhesive potential of) varied materials
- To build structures by joining toothpicks and marshmallows
- To make something beautiful to eat!
Materials:
- Food coloring (optional)
- Marshmallows
- toothpicks (icing and sprinkles: optional)
Procedure: Students make forms by attaching toothpicks to marshmallows. Demonstrations were performed as well. Special Education students also made prints with the marshmallows after dipping them into maps with blown food coloring lines.
Lesson: Maps/finger painting
Grade level: Pre-K, 1, Special Education
Objectives:
- To experiment with finger paints
- To review mixing primary colors making secondary colors
- To make a map
- To review 3 types of lines and use them in the map
Materials:
- Finger paints
- paper
- oil pastels (for 1st grade)
Procedure:
- Introduce a storybook, The Hobbit, and tie in the adventure he is about to embark on with the need for a map!
- Have younger students start painting lines and color mixing. For first graders a further demonstration on how to draw a map (with a legend, river, roads, trees) was performed.
- Students completed the maps with other invented or known symbols.
Lesson: Idea Sketches
Grade level: 5
Objectives:
- To create 4 drawings, each exploring a different idea for a future painting on stretched canvas.
Materials:
- Large paper folded into half (to later be laminated, and formed into a pocket-like portfolio)
- pencils
- mirrors
- exact dimensions of the canvas
Procedure: Students put together the stretchers and traced them 4 times on the outside part of the portfolio. Basic guidelines were given for each of the four drawings: 1) something you love 2) something you fear 3) a self-portrait (using a mirror) and 4) anything at all. Each drawing was to be labeled as such and at least started within the class period. In addition, students were given the assignment to bring images or photographs from home to use as a source for ideas as well.
Lesson: Oil pastels
Grade level: all
Objectives:
- To introduce students to oil pastels and its unique qualities: its greater blendability and vibrancy compared to regular crayons
- To learn cross hatching
- Simultaneously, to draw on envelopes that would be used to collect smaller art work
Materials:
- Oil pastels
- Envelopes of a large size
Procedure: Each student was given an envelope along with a few oil pastels (about 2-3). They drew an enclosed shape, some coloring it in. Later students flipped the envelope over and were instructed how to do crosshatching. Finally, they filled shapes with crosshatching.
Lesson: Idea Sketches (continued)
Grade level: 5
Objectives:
- To finish sketches using oil pastels
- To measure and draw 2 lines intersecting in the middle of the drawing. This was to be a reference point in scale when transferring the sketch to canvas
Materials:
- Pencils
- rulers
- oil pastels
- sketches
Procedure: After explaining the process, students measured their drawings and proceeded to complete above objectives.
Lesson: Abstracting/drawing
Grade level: 5
Objectives:
- To develop our own mysterious interpretation of a recognizable image
- To learn about and make one of: landscapes, portraits, and still life
- To learn the term "abstract"
- To make a finished sketch for a painting
Materials:
- Paper
- color pencils and oil pastels
- National Geographic magazines
Procedure: Josefa explained the ideas and concepts described above to the class. Then materials and magazines were passed out. Many students chose a picture to "abstract" from the magazines. Some brought their own pictures from home.
Notes: Early Animation
Early Animation
Early Animation II
Lesson: Phenakistoscopes
Grade level: 5
Objectives:
- To make Phenakistoscopes (another type of moving image device)
Materials:
For each student:
- a mirror (optional)
- firm, round paper with slits cut around the periphery
- a cork
- a push pin
- black marker
Procedure: similar to flip books, except in a round format, draw simple shapes changing
Lesson: Comic strips (Continued)
Grade level: 5
Objectives:
- To consider what makes a figure comical
- To finish the comics strips
- To learn another way to draw the figure that is proportionately more accurate
Materials:
- Begun comic strips
- paper
- pen
Procedure: Students were presented with a way to draw the human figure at a more realistic proportion (a body=7 ½ times the length of the head). The class drew the figure together with Josefa step-by-step. They later got a chance to finish their strips with goofy characters.
Lesson: Comic strips
Grade level: 5
Objectives:
- To examine an art form easily found in everyday life: comic strips
- To develop a comic strip: a sequential drawing with a story line
- To be presented with a quick figure drawing trick for warm-up
Materials:
- Pre-drawn comic boxes
- pencil
- markers
Procedure:
- Wendy shows examples and gives an intro on comics and Charles Schultz.
- Marissa gives a short demonstration of a trick for drawing figures
- Let students make a sketch before coloring in or using a marker.
Lesson: Thaumatropes

Grade level: Pre-K, Pre-K Special Education, 3,4,5 Special Education and grade 1
Objectives:
- To make thaumatropes that doubled as name tags.
- Again, students were to understand that this was another visual mixing of images (like the flip books). When spun, the two images mix.
Materials:
- For each student: A square piece of cardboard with 2 holes punched in opposite sides
- An elastic band tied through both holes (long enough to form a bib-like device to be hung around the neck)
- black markers, Crayons or magic markers
Procedure: After showing an example, it was explained how to make a Thaumatrope. The class went together step by step. (First starting with the name in 2 corners, then drawing an image in the middle.) Complexity of image, text and instruction varied depending on grade level. Students who were finished early could draw anything they wanted on a separate piece of paper. In one class, students shared their creation to the class one by one.
Lesson: Zoetropes
Grade level: 1
Objectives:
- To make Zoetropes: a type of primitive movie or moving picture device
Materials:
- A spinning zoetrope machine (empty ice cream tub, or hearty paper formed tube-like, with 1/8-inch slits cut around)
- long strips of paper (divided into equal sections: comic strip-like)
Procedure: Draw a simple shape or image repeatedly, making gradual changes like a clock or happy face with moving hands, eyes or mouth. Smoother movement requires attention to transitions between images so that when both ends of the strip meet, the changes continue. After explaining this, each student makes their own Zoetrope. When finished they take turns viewing it in the spinning device.
Part 2: Making Butterflies
Grade level: 1
Objectives:
- To introduce printmaking
- To mix colors
- To make a symmetrical butterfly painting
Materials:
- Red, blue, yellow finger paint
- thick glossy paper
Procedure: Have students fold paper in half, then scoop a little of each color into the center of the paper. Have student fold the paper and press. Open the paper and there's a butterfly!
Lesson: Maps
Grade level: Pre-K, 1, and Special Education (lesson adjusted for each level)
Objectives:
- To make a map by using the three types of lines (straight, curved and angle)
- To compare different methods for making lines, both natural and measured
Materials:
- ruler
- straws
- eye dropper
- food coloring (or ink)
- paper
Procedure:
- Explain how a river is a natural/organic line
- Make lines by blowing drops of ink into a trail
- First graders also made mountains with zigzag lines and roads with straight dashed lines.
- Create boundary lines of states or counties with a ruler (or just frame the irregular lines of the map with straight long lines)
Lesson: Painting with primary/secondary colors
Grade level: Pre-K to 1
Objectives:
- To paint baked clay pieces
- To learn/review primary and/or secondary color mixing (depending on grade level)
Materials:
- Q-tips and toothpicks
- acrylic paint: red, yellow, blue, paper
Procedure:
- Explain color mixing
- Have students paint their baked clay pieces with Q-tips making their own secondary colors by mixing two primary colors together
Lesson: oil pastels
Grade: 5
Objectives:
- To explain right brain/left brain functions
- To experiment with layering and blending oil pastels
- To make free drawings of pure color and large free marks
- To experience layering and modeling color like one would in a painting
Materials:
Procedure: After explaining right brain and left brain functions, tell students that art involves both. (Josefa explained how last class was left brained, full of measuring). Let students experiment with layering and blending oil pastels; a Right Brain exercise.
Lesson: Group collaboration: Thank You Gift
 Hills Project Gift - 12/3/99
Grade level: All
Objectives:
Hills Project Gift - 12/3/99
Grade level: All
Objectives:
- To create a collaborative piece to be presented as a gift to the Hills Project patrons
- To review some basic ideas (depending on grade level: lines, color, organic/ geometric shapes etc.)
Materials:
- The base consisted of 6 1-foot square gator-boards (with Josefa's silk screen prints on them)
- water-based ink
- rollers
- pens or oilsticks
Procedure: Every student contributes to the project with exactly one line, one shape, one handprint, and one signature. Josefa later framed each foam board with balsa wood, glue, and pins.
|